Tuesday 20 November 2012
Chapter 14: Digital Video Data Sizing
Digital Video Data Sizing
Data sizing is used for calculating the size of a video or movie. There a some calculation needed to be done before you can determine the size of a data. In order to calculate the size of a video, you must calculate the picture/frame rate of the video and the audio size.
Calculating the File Size of an Uncompressed Digital Video
The formula is as follows
Calculating the File Size of an Uncompressed Audio File
Data sizing is used for calculating the size of a video or movie. There a some calculation needed to be done before you can determine the size of a data. In order to calculate the size of a video, you must calculate the picture/frame rate of the video and the audio size.
Calculating the File Size of an Uncompressed Digital Video
- Raw video data size = frame size (width X height) * frame rate (fps) * colour depth (in bytes) * time (in seconds)
8 bits = 1 byte
1 kilo(bit/byte) = 1,024 (bits/bytes)
1 mega(bit/bytes) = 1,048,576 (bits/bytes)
1 giga(bit/bytes) = 1,073,741,824 (bits/bytes)
The formula is as follows
8-bit mono Seconds x kHz = Size
16 - bit mono (Seconds x kHz) x 2 = Size
8 - bit stereo (Seconds x kHz) x 2 = Size
16 - bit stereo ([Seconds x kHz] x 2) x 2 = Size
16 - bit 5.1 ([Seconds x kHz] x 2) x 6 = Size
Eg. The file size for a 30 seconds of 16-bit, 11kHz mono audio is: (30 X 11) X 2 = 660KB
Factors to consider when selecting graphics to be used in a multimedia project
- Purpose
- Quality
- Cost
Tuesday 30 October 2012
Chapter 13 : Brushing and Blending Tools
Brushing and Blending Tools
Clone Stamp Tool
The clone stamp tool is probably the most tedious tool in Photoshop, but at the same time may be one of the most important tools. When restoring old photos it is indispensable. It is used for copying (or “cloning”) one part of a picture to another. The clone tool is useful for the following purposes:
Method 1:
Method 2:
To retouch with a pattern, use Method 3:

Clone Stamp Tool
The clone stamp tool is probably the most tedious tool in Photoshop, but at the same time may be one of the most important tools. When restoring old photos it is indispensable. It is used for copying (or “cloning”) one part of a picture to another. The clone tool is useful for the following purposes:
• Fixing defects in photographs (dust, scratches, tears, stains, vignetting, etc.)
• Removing unwanted items from a picture (phone wires, trash, mother-in-law)
• Artistic effects
• Removing unwanted items from a picture (phone wires, trash, mother-in-law)
• Artistic effects
The clone tool is selected from the tool bar with the symbol shown below. To use the clone tool a source and destination point are selected. The source is defined by typing ALT and clicking with the mouse. Once the source has been defined, the image is copied by clicking with the mouse.
Healing Brush Tool
- This will let you correct imperfections.
- The "Healing Brush Tool" is like the clone tool except the Healing Brush will match the texture,lighting, and shades of the sampled area to the source area.
- The result of the repair makes the whole image blend together.
Patch Tool
The Patch Tool retouches image using sampled pixels or pattern. It works as a combination of the Healing Brush  with the Lasso
  Tool:
Tool:
with the Lasso Tool:
There are 2 methods to retouch using sampled pixels.
Method 1:
- In the Toolbox, select the Patch
 Tool.
Tool. - Drag in (select) a damaged area with the Patch Tool**(exactly like with Lasso Tool)
- On the Options bar, choose the Source mode.
- Drag the selection (cursor inside the selection) onto a repair-source area (movie).
Method 2:
- Drag in a repair-source area with the Patch Tool*.
- On the Options bar, choose the Destination mode.
- Drag the selection (cursor inside of selection) onto a damaged area (movie).
To retouch with a pattern, use Method 3:
- Drag in a damaged area with the Patch Tool*.
- In the Pattern picker, choose a pattern (movie).
- Click the Use Pattern button on the Options bar.
The picture we edited in class
Saturday 13 October 2012
Chapter 12: Using Windows Movie Maker
Broadcast Video Standards
1. NTSC (National Television Standards Committee)
- 525 lines/60Hz
- This standard is used primarily in North America, Taiwan, South Korea, Japan.
- 625 lines/50Hz
- This standard is used primarily in Europe, Asia, and Southern Africa.
- 625 lines/50Hz
- This standard is used primarily in France, parts of Middle East, and Russia.
This is a tutorial video on how to use Movie Maker Software
Wednesday 10 October 2012
Chapter 11: Drawing Shapes
Drawing Shapes
There are three different types of shapes can be created with shape tools
There are three different types of shapes can be created with shape tools
- Clipping mask is a shape that acts like a cookie cutter.
- Path shape is like the paths created with the pen tool.
- Fill shape is created with pixels.
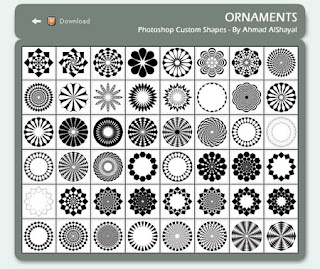
The is also custom shape
- Instead of making our own shape, photoshop also provided a lot of custom made shapes that can be used as a shape
Saturday 1 September 2012
Chapter 9 & 10: Text
Text
All text are vectors and Photoshop type also produce vectors. Vectors are composed of lines and points.
Type Tools
•Point text is created by clicking on the image and typing (Click & Type)
•A Text box is created by clicking and dragging to add a text box to the image. (Click & Drag)
•To add type, click on the image with the Type tool
Type Layers
Distorting Type
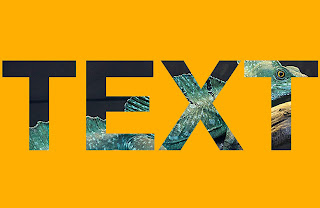
Using Text as a Clipping Mask
All text are vectors and Photoshop type also produce vectors. Vectors are composed of lines and points.
Type Tools
•Point text is created by clicking on the image and typing (Click & Type)
•A Text box is created by clicking and dragging to add a text box to the image. (Click & Drag)
•To add type, click on the image with the Type tool
- Type at the insertion point
- A new type layer is created
•When type layers are linked, they can be moved as one layer
•Type layers can be merged or combined into one layer
•Flattening or merging layers containing type will rasterize the type
•Rasterized type is not editable
•It is always a good idea to save a copy of the file in PSD format to preserve all data
•Type layers can be merged or combined into one layer
•Flattening or merging layers containing type will rasterize the type
•Rasterized type is not editable
•It is always a good idea to save a copy of the file in PSD format to preserve all data
•Adjusting the space between letters is called kerning.
•The overall letterspacing of words or strings of words is called tracking.
•The overall spacing between lines in a paragraph is called leading.
•The Warp Text dialog box contains 15 options for creating special text effects.
•Warping text allows you to fit text to specific design problems.
•The overall letterspacing of words or strings of words is called tracking.
•The overall spacing between lines in a paragraph is called leading.
•The Warp Text dialog box contains 15 options for creating special text effects.
•Warping text allows you to fit text to specific design problems.
•A type mask can be used to add a gradient fill to text.
•The type mask is a selection in the shape of type that can be filled.
•The type mask is a selection in the shape of type that can be filled.
Example
Friday 31 August 2012
Chapter 8 : Filters and Effects
Effects and Filters
Filters are easy to learn and use, and yet are one of Photoshop’s most powerful features. When used properly, they can recreate a number of photographic and artistic effects, can enhance the quality of your images, and can even distort them in ways which would otherwise be very tedious and time-consuming.Each filter produces its own unique effect, which you can adjust and manipulate before it is applied. Also, a filter may be applied even after another has been used, with the end result being a combination of the two filters used. The order that you apply the filters has an effect on what the end result looks like; for example, running Add Noise followed by Blur will give you a blurry image with fuzzy dots on it, whereas the reverse combination would give a blurry image with sharp dots. Since filters can be used in any order, and each has its own controls, there is practically no limit to the different ways in which you can apply and combine them.
Examples of Effect and Filter
Artistic Effects Applied
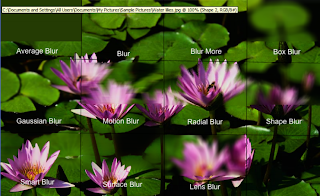
Blur Effects Applied

Brush Stroke Effect Applied

Render Effects Applied

Distort Effects Applied

Sketch Effects Applied

Tuesday 28 August 2012
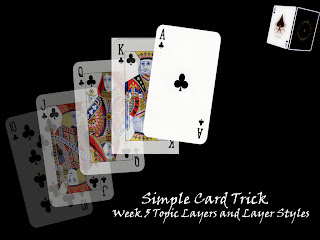
Chapter 6 & 7 : Working With Layers and Layer Styles
Layers
What is a layer ?
- In the program you can stack, merge or define layers when creating a digital image. Layers can be partially obscured allowing portions of images within a layer to be hidden or shown in a translucent manner within another image, or you can use layers to combine two or more images into a single digital image. For the purpose of editing, working with layers allows you to go back and make changes within a layer as you work.
The layers palette shows you the stacking order of the various layers in your document along with a thumbnail to help you identify each layer at a glance. As mentioned previously, only a single layer can be edited at one time. The active layer will be highlighted in your layers palette.In addition, the active layer will have a paintbrush symbol in the small square just left of the thumbnail. Double-clicking on a layer in the palette gives you access to layer styles, as well as some advanced blending options that we will not be discussing in this course. Unlike previous versions, renaming a layer in Photoshop requires you to Alt/Option double click on the layer name.
You'll also notice a small eye icon  for each layer. Clicking on this icon lets you toggle the layer visibility on and off.
for each layer. Clicking on this icon lets you toggle the layer visibility on and off. To link layers to the currently active layer, you would click in the second square (left of the thumbnail) in the layers palette. A link icon will appear in the space to indicate that the layers are linked.
Below the blend mode and opacity controls, you have a series of checkboxes for locking various editing functions. From left to right the lock can be applied to:
When any of the locks are activated, you will see a small lock icon appear to the right of the layer in the layers palette. When all locks are activated, the lock icon will turn solid. You'll notice the background layer always has its transparency and position locked. This cannot be changed without promoting the background to a layer.
 transparency,
 image pixels,
 position, and
 all of the above.

- The transparency lock allows you to edit on a layer without changing the transparency level of the pixels in that layer.
- The image pixels lock disables all painting tools for that layer. You can still move and transform the layer contents, adjust opacity settings, and change blend modes, but you cannot paint directly on it.
- The position lock is self explanatory. You can't move or transform a layer that has its position locked, but you can still paint on it, apply layer effects, and change blend modes.
- And if you hadn't guessed already, the last lock is the same as selecting all three locks.
A picture that i have edited during the class
Monday 27 August 2012
Chapter 4 & 5 Multimedia
Manipulating Selections
Selections can be manipulated in a number of ways. After making an initial selection you can make an additional selection that can be added to, subtracted from, or intersected with the original. A selection marquee can be transformed in terms of its size, position, rotation, skew, and perspective.
Selections can be manipulated in a number of ways. After making an initial selection you can make an additional selection that can be added to, subtracted from, or intersected with the original. A selection marquee can be transformed in terms of its size, position, rotation, skew, and perspective.
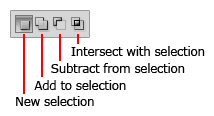
New Selection
Unless you specify otherwise, every new selection will replace a previous selection. Let's say you create a selection with the Marquee tool and release the mouse button. If you so much as click again on the image with a selection tool, Photoshop assumes you want to draw a new selection and the old one will be removed. This is because the Selection Options are set to New Selection as the default behaviour.
Add to Selection
You may want to isolate more than one area of the image for modifications or select multiple areas with different colours. In the example at right, the Magic Wand tool was used to make the selections.
- Make the first selection.
- Click on the Add to Selection button in the Selection Options. The selection cursor will now display a small plus sign.
- Make the second selection.

Subtract from Selection
As you're fine-tuning a selection, you may want to remove areas from the selection. The process is exactly the same as before but you click the Subtract from Selection button before starting your next selection. The selection cursor will display a small minus sign.

Intersect With Selection
The last button in the Selection Options is called Intersect with Selection. This option compares the two selections and the resulting selection will contain only those areas that were common to both selections. After you draw your first selection, press the Intersect with Selection button and the selection cursor will display a small X sign. Then draw the second selection.

Lasso Tools: The lasso tools are great for making more complicated or irregular selections. The three tools in this group are the Lasso Tool (freehand selections), the Polygonal Lasso (shapes with straight edges)and the Magnetic Lasso (automatically finds the strongest edge of an image).
The Magic Wand is a "shortcut" tool that makes selections based on color.
Once a selection has been made you can scale it, rotate it, skew it or apply perspective to its shape. Transforming a selection does not affect the underlying pixels. This just helps you to modify or reshape your selections. Here are some example of Transforming Selections
- Horizontal Scale

- Vertical Scale

- Scale

- Rotate

- Move Reference Point

- Skew

- Perspective

A Picture that we edited in class for this lesson
Tuesday 21 August 2012
Week 2 : Chapter 2 & 3
Chapter 2: Viewing and Managing Documents
RGB, CMYK, Greyscale and BitMap they all serve a purpose and they all serve them well.
RGB - Red, Green, and Blue. The same color system that makes up viewing an image on a computer monitor (also the same as on a tv). The process of defining your image is to blend the three main colors (Red, Green, and Blue) to achieve the desired color in your fil. It's the image color of choice for photos viewed on screen. It has the widest range of color available for your photoshop image.
CMYK - Cyan, Magenta, Yellow, Black. This process takes the aforementioned four colors and blends them to achieve the desired color of your image. This process is the same as on a full color printing press, therefore if you are printing your image file, this color mode gives you the most accurate representation of what will be printed. Remember however your monitor is RGB so your CMYK color mode won't view perfectly on your monitor compared to a printed sheet.
Greyscale - Think black and white photo here. A greyscale image has black, white, and every scale of grey in between (256 of them actually). Images in greyscale are used in printing, one color will print the entire image, most often a black ink, and the shades of grey are just less heavy ink (called halftones). On the web, greyscale images are generally saved a .jpg files and are a smaller image file for downloading then saved in a colour format.
Bitmap - A bitmap image is made up of black or white and nothing in between. A bitmap image is best used for line drawings, signatures, or logos made up of one solid colour. If the resolution of a bitmap image is high enough, a bitmap image will print great, but often doesn't look too sharp on the web.
Changing the On-Screen Size of an Image
Understanding Color Modes in Photoshop
RGB, CMYK, Greyscale and BitMap they all serve a purpose and they all serve them well.
RGB - Red, Green, and Blue. The same color system that makes up viewing an image on a computer monitor (also the same as on a tv). The process of defining your image is to blend the three main colors (Red, Green, and Blue) to achieve the desired color in your fil. It's the image color of choice for photos viewed on screen. It has the widest range of color available for your photoshop image.
CMYK - Cyan, Magenta, Yellow, Black. This process takes the aforementioned four colors and blends them to achieve the desired color of your image. This process is the same as on a full color printing press, therefore if you are printing your image file, this color mode gives you the most accurate representation of what will be printed. Remember however your monitor is RGB so your CMYK color mode won't view perfectly on your monitor compared to a printed sheet.
Greyscale - Think black and white photo here. A greyscale image has black, white, and every scale of grey in between (256 of them actually). Images in greyscale are used in printing, one color will print the entire image, most often a black ink, and the shades of grey are just less heavy ink (called halftones). On the web, greyscale images are generally saved a .jpg files and are a smaller image file for downloading then saved in a colour format.
Bitmap - A bitmap image is made up of black or white and nothing in between. A bitmap image is best used for line drawings, signatures, or logos made up of one solid colour. If the resolution of a bitmap image is high enough, a bitmap image will print great, but often doesn't look too sharp on the web.
Changing the On-Screen Size of an Image
You can change the size at which an image displays on your computer monitor so that users
can see the entire image.
can see the entire image.
• To change the on-screen image size, click Image > Image Size


Chapter 3: Painting and Drawing with Colour
Brushes Palette are used to modify, improve or repair an image. It is also used to create an image from scratch.
Painting tools include:
 ), paintbrush (
 ), airbrush (
 ), and pencil (
 ) tools. The editing tools are history brush, rubber stamp, smudge, focus, toning. The paint bucket tool (
 ) fills adjacent pixels that are similar in color value to the pixels you click.
Painting tools include:
- Brush tool
- Gradient tool
- History Brush & Art History Brush
- Color Replacement tool
), paintbrush (), airbrush (), and pencil () tools. The editing tools are history brush, rubber stamp, smudge, focus, toning. The paint bucket tool () fills adjacent pixels that are similar in color value to the pixels you click.
The Gradient Tool is very similar to the paint bucket tool, in that it fills entire areas or selections with colors. However, rather than filling an area with a solid color, the Gradient Tool creates a series of colors than blend into one another.
When the gradient tool is selected, a preset gradient can be selected from the gradient picker in the options bar. A gradient can then be created in the active image area by clicking and holding the mouse button, and dragging in the direction you’d like the gradient to go. Release where you’d like the gradient to stop.
 5 different gradient styles which can be selected to create different effects. You can set them from the Options Bar.
When the gradient tool is selected, a preset gradient can be selected from the gradient picker in the options bar. A gradient can then be created in the active image area by clicking and holding the mouse button, and dragging in the direction you’d like the gradient to go. Release where you’d like the gradient to stop.


Example of a project that we made during class
Subscribe to:
Posts (Atom)